Do you often get frustrated by your photographs? Does it seem like your camera can’t seem to capture a scene the way your eyes can? If you think about it, the differences aren’t surprising; your camera doesn’t see the world like you do. Whether you take pictures with your phone or with a high end digital SLR camera, the images your eyes see and the photographs your camera captures won’t be the same. That’s not a bad thing, it just means you have to understand what your camera sees and how it works so you can create images that make you happy.
Here’s a good initial example of what I’m talking about. Both our eyes and our camera see the world through a lens. However, the lens in our eyes is very different than camera lenses, even a “normal” camera lens, which is supposed to capture scenes with a perspective close to what we see. If you can let go of the idea that a camera should see what you see, there are some nice advantages to using camera lenses to view the world. Even a phone camera can zoom in and out, providing a range of focal lengths, all of which provide a perspective that can be helpful, though different from what your eye sees.
Wide angle lenses do just what their name implies – they give you a broad field of view. You can include a lot of scenery in your image, though most of it will look a lot smaller in the photograph than it appears to your eye. Wide angle lenses can capture a broad landscape, but they can also be helpful in showing your subject (flower, animal, etc.) embedded within its surroundings.

A wide angle lens helped me capture a relatively close-up photo of this yellow ladies slipper plant while also showing the woodland context around it.
The opposite end of the field-of-view spectrum is a long-focus lens. Long-focus lenses work like binoculars, allowing you to better see objects that are far away, which is obviously handy for photographing things like birds. While they magnify, however, long-focus lenses also greatly compress a scene, making near and far things look like they’re closer together than they are. Long-focus lenses are great for wildlife photography, but they can also create very interesting landscape images. They don’t, however, create images that look like what you see in real life.

While long-focus lenses can be great for wildlife photos, they can also help condense expansive landscapes, which ironically helps emphasize the size of those landscapes.
Macro lenses provide magnification of small objects, allowing you to see insects, flowers, or other small subjects in ways your naked eye never could. You can count the hairs on a spider’s leg or the scales on a butterfly’s wing. However, at close magnification, the depth of field (what’s in focus at various distances from the lens) is very shallow. The same thing happens when we peer closely at objects with our eyes, but our brain compensates for that and we don’t notice as much as we do when looking at an image taken with a macro lens.

Macro lenses open up a tiny world to exploration, and help you see details of small creatures and other tiny subjects you might not otherwise pay attention to.
A second major difference between your camera and you has to do with light intensity. A camera’s sensor (or film in the old days) can only record a limited range of light intensity. On a bright sunny day, the camera can see details in the shadows, but at the expense of the bright sky becoming completely washed out. Alternatively, the camera can record the color and details in the bright sky but all shadows become completely black. This can result in images that seem jarring to us because although our own eye has similar limitations, our brain interprets what comes through our eyes in real time. We can alternately look at shadows and highlights as we scan across a scene, and our brain stitches it all together. A still photo can only capture one or the other extreme of intense light.
Understanding that your camera can’t record the entire range of light intensity lets you make decisions about what’s most important for each scene you’re recording. You can tell the camera to prioritize for bright or dark areas. Generally speaking, on bright days you’ll want to “shoot a little dark”, meaning that you tell the camera to capture detail in the bright portions of the scene at the expense of losing detail in the shadows. With processing software, you can often recover some detail in shadows, but it’s nearly impossible to do the same in washed out highlights.

The intense light created by bright midday sunshine is too much for a camera to handle. Shadows can turn completely black and/or highlights get washed out, often making images that aren’t very aesthetically pleasing. Working in photoshop, I was able to recover some detail in the shadowy foreground, but the overall contrast of the image is still too much.
You can reduce frustration regarding light intensity by shooting when that intensity is lower. Mornings and evenings are great for this. When the sun is near the horizon its light is less bright than when it is high in the sky. During those periods, your camera can capture the entire range of intensity from bright to dark, creating nice evenly lit images. Bright overcast days can also be great, especially for close-up photography, because the light is strong enough to illuminate your subjects but not so strong that it creates distracting shadows. However, landscape photos taken on bright overcast days usually result in a sky that is uniformly (and annoyingly) bright white or gray. Again, you can adjust for that if you know it’s going to be an issue, and just minimize the amount of sky shown in the image.

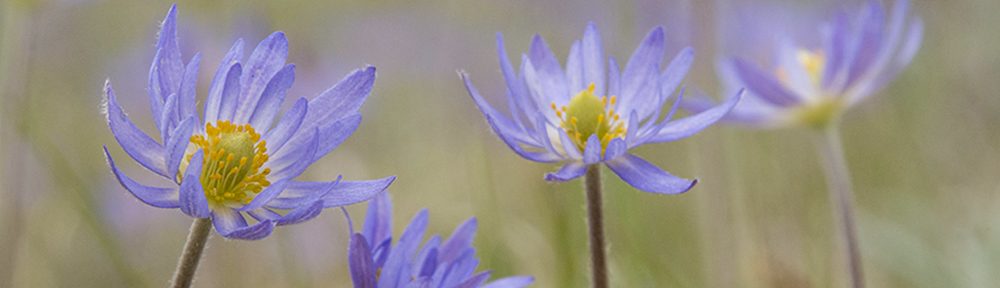
The soft and warm quality of early morning light boosted the color in these flowers without creating starkly contrasting shadows.
In addition to understanding limitations regarding the range of light conditions a camera can handle, it’s also important to understand how your camera reads light and makes automated decisions about how to adjust for lighting conditions. Modern cameras all have internal light meters that read a scene, and if you let them, will decide how to create an image based on that reading. You can adjust settings for that meter so that it either reads a particular part of a scene or averages across the whole thing. Both can be useful in certain situations.
You also need to understand that when you let the camera make decisions about exposure based on its light readings, it will try to create an image with a neutral medium tone (not too bright, not too dark). That’s perfect in many situations, but if you’re trying to take a picture of white snow on a bright day, leaving the camera on automatic will result in a disappointing photo of very medium toned gray snow. Likewise, automated photos of sunsets will create images of starkly black silhouettes against a medium toned colorful background. That can be really nice, but if you want to see any details in the foreground, you’ll have to override your camera to do so. Learn how to adjust the exposure settings on your camera (including camera phones) so you can both adjust them in situations where you know your camera will have a different artistic vision than your own.

There was a huge difference in light intensity between the dark shadows and still bright sky immediately after this sunset. In order to expose correctly for the sky and maintain the orange color (and show the texture of the river) I had to allow the shadows to go completely black. If I’d set the camera so that details were visible in the shadows, the sky would have washed out completely.
We tend to see the world in video format (unless you walk around with your eyes closed and just quickly open and close them periodically, which I guess could be fun too). Still photos capture a brief moment in time, and that in itself can make photographs seem a little unreal. A camera’s shutterspeed is the amount of time light is allowed into the camera to hit the sensor. Fast shutterspeeds freeze motion while slow shutterspeeds create blur. Both can be useful, depending upon your artistic vision. Your eye and brain see images continually, so you don’t have to think about shutterspeed, but it’s an important factor in photography.

A fast shutter speed froze the falling water in this photo of Smith Falls in northern Nebraska. A slower shutter speed could have been nice too, letting the water appear blurry as it moved through the frame.
Similarly, we don’t spend much time thinking about where our eyes should focus as we explore the world. While our eyes can only focus at one distance at a time, we can scan scenes and shift focus so smoothly, we don’t notice that it’s even happening. A camera, however, is capturing still images and needs your help deciding what part of a scene most needs to be in focus. When photographing people, we usually want faces to be in focus, and many modern cameras are pretty good at identifying and focusing on faces automatically. Apart from that, however, the default of most cameras is to focus on something near the center of the field of view. That’s great unless your intended subject is near the edge of the frame and out of focus when you look at the resulting image. Learn how to change the settings on your camera to direct where it focuses. That way you’ll know where it will try to focus automatically and how to step in and change that when needed.

In this wide-angle image, it was important to have the white blossoms near the top left of the frame be in focus.
The fact that cameras don’t record exactly what our eyes see do isn’t really a disadvantage. It’s only frustrating if you have unreasonable expectations. Camera lenses let us capture images we’d never be able to see with our own eyes, but those images are no less “real” – they’re just different. If you can understand and control your camera, you can create beautiful and impactful photographs that capture a sense of place or a moment in time. Just remember that your images (and those of others) also represent an interpretation of that place or time, one that is created by a camera and its operator.

This is a fine, useful post that already’s been tucked into my files. Thanks!
Very good points.
Thanks for another interesting article. I have much frustration using my Canon Powershot SX260HS camera. I never learned all the various features because the manual is so difficult to undertstand. Often times my close ups are blurry, while other similarly close shots are perfectly fine. Drives me nuts. I also have trouble getting the little box in my view finder to land on the part of the shot I want in focus, even when the item is clearly the largest thing in the shot. I’ll have to do some online research since this has been an ongoing problem for me for years. I guess I let it go for so long since I don’t have to develop the shots that don’t turn out good. But I also lose a lot shots while trying to get a good one, as the bird or inset flies off. Thanks for a great reminder.
Loved this post! It explains some of the more complicated things for people like me who just have a small point and click camera. Thanks :)
Pingback: Best of 2018 – Part 2 – The Prairie Ecologist
Pingback: Shooting Into the Sun | The Prairie Ecologist